# Arduino manual pdf uno
**Download links:** \
\
→ [**Arduino manual pdf uno**](http://landtravusre.darkandlight.ru/?dl\&keyword=arduino+manual+pdf+uno\&source=gitbook.com5_poster_download) \
\
→ [**Arduino manual pdf uno**](http://landtravusre.fastdownloadportal.ru/?dl\&keyword=arduino+manual+pdf+uno\&source=gitbook.com5_poster_download) \
\
\
\
\
\
\
\
\
\
\
\
\
\
\
\
\
\
\
\
\
\
\
\
\
\
\
\
\
\
\
\
\
\
\
Естественно, больший размер UNO по сравнению с Nano в некоторых случаях является преимуществом, а в некоторых — недостатком. Notice that there are series resistors in the D+ and D- USB lines. Note that RX and TX from the USB bridge are connected with pin0 and pin1.\

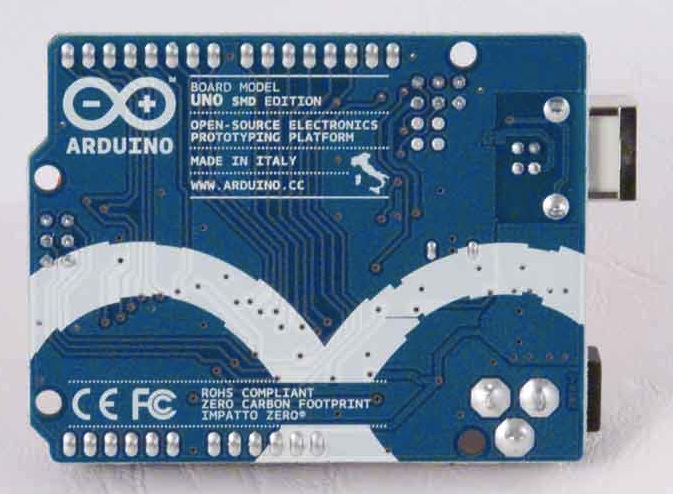
This diode provides reverse-polarity protection. Besides using it as a serial interface, it can also be used to program the MCU using a standalone programmer. The 100nF capacitor connected in series with the reset line allows the Atmega16U2 to send a reset pulse to the Atmega328. Arduino Uno — это базовая и самая популярная версия микроконтроллеров. Схема довольно простая: Скачать ее в формате PDF тут: или в формате EAGLE тут:. Для работы с интерфейсом SPI используйте. Be aware that the VIN pin in the power header is not protected. I entered the SMD world years ago when I dug into Arduino PCB design while I was a part of a team redesigning a for Arduino UNO. Following this, if the value of the variable j is greater than 4, the program will skip to the instruction tagged with the specified label, and if not, the line following the if statement will be executed.
This can be used to store data that must be available even after the board is powered down and then powered up again. The diode protects against an external power supply with wrong polarity being plugged in.\
**Arduino Projects** - В некоторых случаях можно встретить вариант с разъемом Micro USB. This header is used when you need to flash the MCU, for example, with a bootloader for the first time in production.\

This article explains how Arduino works from an electronic design perspective. Most articles explain the software of Arduinos. However, understanding hardware design helps you to make the next step in the Arduino journey. A good grasp of the electronic design of your Arduino hardware will help you learn how to embed an Arduino in the design of a final product, including what to keep and what to omit from your original design. Components Overview The PCB design of the Arduino UNO uses SMD Surface Mount Device components. I entered the SMD world years ago when I dug into Arduino PCB design while I was a part of a team redesigning a for Arduino UNO. Integrated circuits use standardized packages, and there are families for packages. The dimensions of many SMD resistors, capacitors, and LEDs are indicated by package codes such as the following: SMD package code for discrete components such as resistors, capacitors, and inductors. Most packages are generic and can be used for different parts with different functionality. The SOT-223 package, for example, can contain a transistor or a regulator. After your code is compiled using Arduino IDE, it should be uploaded to the main microcontroller of the Arduino UNO using a USB connection. The bridge in the latest revision is the ATmega16U2, which has a USB transceiver and also a serial interface UART interface. To power your Arduino board, you can use the USB as a power source. Another option is to use a DC jack. To reset your board, you should use a push button in the board. Another source of reset should be every time you open the serial monitor from Arduino IDE. I redistributed the original Arduino UNO schematic to be more readable below. I advise you to download it and open the PCB and schematic using Eagle CAD while you are reading this article. Redistributed version of the original Arduino schematic. The Microcontroller It is important to understand that the Arduino board includes a microcontroller, and this microcontroller is what executes the instructions in your program. The ATmega328 microcontroller is the MCU used in Arduino UNO R3 as a main controller. ATmega328 is an MCU from the AVR family; it is an 8-bit device, which means that its data-bus architecture and internal registers are designed to handle 8 parallel data signals. This is used for storing application, which explains why you don't need to upload your application every time you unplug arduino from its power source. This is used for storing variables used by the application while it's running. This can be used to store data that must be available even after the board is powered down and then powered up again. Let us briefly go over some of this MCU's specs: Packages: This MCU is a DIP-28 package, which means that it has 28 pins in the dual in-line package. Most of the pins are multifunctional, which means that the same pin can be used in different modes based on how you configure it in the software. This reduces the necessary pin count, because the microcontroller does not require a separate pin for every function. Other packages of ATmega328 are available like TQFP-32 SMD package Surface Mount Device. Two different packages of the ATmega328. Images courtesy of and. Power: The MCU accepts supply voltages from 1. However, there are restrictions on the operating frequency; for example, if you want to use the maximum clock frequency 20 MHz , you need a supply voltage of at least 4. There are also some pins that can be configured as PWM output. Note: The ATmega168 is almost identical to the ATmega328 and they are pin compatible. The difference is that the ATmega328 has more memory—32KB flash, 1KB EEPROM, and 2KB RAM compared to the ATmega168's 16KB flash, 512 bytes EEPROM, and 1KB RAM. ATmega168 pinout with Arduino labels; the ATmega168 and ATmega328 are pin compatible. Arduino UNO R3 pinout. These pins are connected to the analog header on the Arduino board. You can configure that using an internal register. Internal register settings for selecting the Vref source. The ATmega328 has only one UART module. The pins RX, TX of the UART are connected to a USB-to-UART converter circuit and also connected to pin0 and pin1 in the digital header. SPI Peripheral: The SPI Serial Peripheral Interface is another serial interface. The ATmega328 has only one SPI module. Besides using it as a serial interface, it can also be used to program the MCU using a standalone programmer. You can reach the SPI's pins from the header next to the MCU in the Arduino UNO board or from the digital header as below: 11MOSI 12MISO 13SCK TWI: The I 2C or Two Wire Interface is an interface consisting of only two wires, serial data, and a serial clock: SDA, SCL. You can reach these pins from the last two pins in the digital header or pin4 and pin5 in the analog header. You may not be aware of the functions that you don't use in your code. You can refer to the datasheet for more information. Arduino UNO R3 MCU part. Note that RX and TX from the USB bridge are connected with pin0 and pin1. You can also see the D2 diode. Read more about capacitors in the. The Arduino board uses a buffer the LMV358 to drive the LED. This header is used when you need to flash the MCU, for example, with a bootloader for the first time in production. The USB-to-UART Bridge Arduino USB bridge part. This is done using special firmware uploaded to the ATmega16U2. From an electronic design perspective, this section is similar to microcontroller section. This MCU has an ICSP header, an external crystal with load capacitors CL , and a Vcc filter capacitor. Notice that there are series resistors in the D+ and D- USB lines. These provide the proper termination impedance for the USB signals. They are used to protect the USB lines against ESD transients. The 100nF capacitor connected in series with the reset line allows the Atmega16U2 to send a reset pulse to the Atmega328. You can read more about this capacitor. The Power For a power source, you have the option of using the USB or a DC jack. This diode provides reverse-polarity protection. The output of the 5V regulator is connected to the rest of 5V net in the circuit and also to the input of the 3. You can access 5V directly from the power header 5V pin. Another source of 5V is USBVCC which is connected to the drain of an FDN340P, a P-channel MOSFET, and the source is connected to the 5V net. The gate of the transistor is connected to the output of an LMV358 op-amp used as a comparator. If there is no Vin applied, the V+ of the comparator is pulled down to GND and Vout is low, such that the transistor is on and the USBVCC is connected to 5V. Power source switching mechanism. The LP2985-33DBVR is the 3V3 regulator. Both the 3V3 and 5V regulators are LDO Low Dropout , which means that they can regulate voltage even if the input voltage is close to the output voltage. This is an improvement over older linear regulators, such as the. The last thing I'll talk about is the power protection that is provided in Arduino UNO. As mentioned above, VIN from a DC jack is protected from reverse polarity by using a serial M7 diode in the input. Be aware that the VIN pin in the power header is not protected. This is because it is connected after the M7 diode. VIN pin from power header. When you use USB as a power source, and to provide protection for your USB port, there is a PTC positive temperature coefficient fuse in series with the USBVCC. This provides protection from overcurrent, 500mA. When an overcurrent limit is reached, the PTC resistance increases a lot. Resistance decreases after the overcurrent is removed. Reading the post about protection in Arduino is very useful. You should now be more familiar with the Arduino UNO's electronic design and have a better understanding of its hardware. I hope this helps your design projects in the future! Decoupling capacitors should have low ESL and low ESR. This becomes more important when higher frequencies are involved, but you might as well get into the habit of choosing good capacitors, even for lower-speed designs. In general you can use typical ceramic capacitors, and as frequency increases you need to pay closer attention to ESL, ESR, and capacitor placement. Please refer to the following article for thorough information on decoupling caps. Be aware that the VIN pin in the power header is not protected. This is because it is connected after the M7 diode. The diode protects against an external power supply with wrong polarity being plugged in. Makes complete sense if you have a box of wall warts standing around. A mistake is easily made then. If your project is finished, all you need to worry about is someone plugging in a power supply with the wrong polarity. Of course you couid ruggedize everything….